
In today’s fast-paced world, having a portable scanner can be incredibly useful. Whether you need to digitize important documents, receipts, or even create digital copies of handwritten notes, a scanner app on your phone can simplify the process significantly. This article will guide you on how to effectively use your phone as a portable scanner, covering everything from choosing the right app to optimizing scan quality and organization. Learn how to harness the power of your smartphone to create high-quality digital copies, eliminating the need for bulky and expensive traditional scanners.
Transform your smartphone into a powerful portable scanning tool. Discover the convenience of digitizing documents on the go, anytime, anywhere. This comprehensive guide will delve into the best scanner apps available, offering step-by-step instructions on how to use them effectively. We’ll cover various techniques for capturing clear and legible scans, along with tips for organizing and managing your digital files efficiently. By the end of this article, you’ll be equipped to use your phone as a versatile portable scanner for all your document-scanning needs.
Best Scanner Apps for Android and iOS
Several excellent mobile applications transform your smartphone into a powerful portable scanner. These apps offer features beyond simple image capture, often including optical character recognition (OCR), cloud integration, and various editing tools. Choosing the right app depends on individual needs and preferences.
Top Scanner App Options
For Android users, popular choices include Adobe Scan, Microsoft Lens, and Clear Scan. These apps are known for their ease of use, robust features, and reliable performance. They provide high-quality scans and seamless integration with other productivity apps.
On the iOS platform, notable options include Genius Scan, Scanner Pro, and SwiftScan. These apps offer similar functionality with a focus on user-friendly interfaces and advanced editing capabilities. They cater to both casual users and professionals requiring precise document scanning.
Tips for Clear and Accurate Scans
Ensure optimal scan quality by following these tips:
Preparation
Steady Surface: Place your document on a flat, stable surface to avoid distortions. Good Lighting: Ensure ample, even lighting to minimize shadows and enhance clarity. Clean Document: Remove any smudges, wrinkles, or obstructions from the document’s surface.
Scanning Technique
Steady Hand: Hold your phone steady and avoid unnecessary movement during the scan. Proper Alignment: Align the document within the scanning frame, ensuring all edges are captured. Adjust Focus: Tap the screen to focus on the document if necessary.
OCR and Text Recognition Features
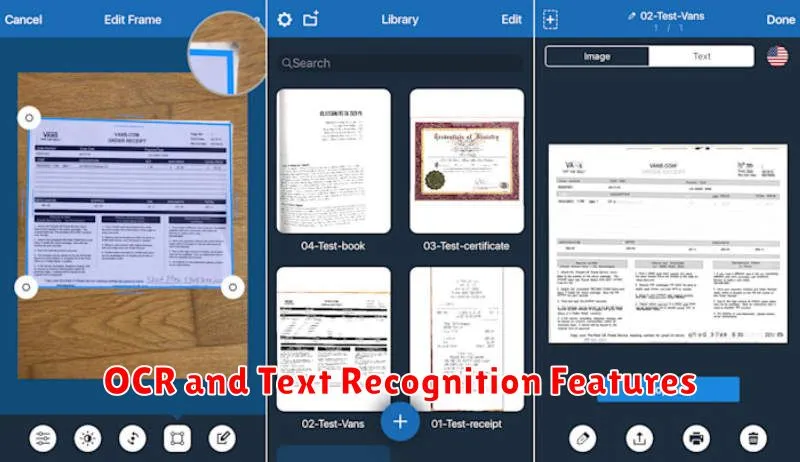
Optical Character Recognition (OCR) transforms images of text into editable and searchable digital text. Many scanning apps incorporate OCR technology, allowing you to convert scanned documents like receipts, letters, or notes into text files.
This functionality is incredibly useful for archiving and organizing information. Instead of simply having an image of a document, you have a searchable, copy-and-pasteable text version. Look for apps that support OCR in multiple languages if you frequently work with diverse documents.
Some apps even offer real-time text recognition within the camera viewfinder. This allows you to select and extract text from the world around you, such as a snippet from a poster or a paragraph from a book, without having to take a photo first.
Storing Scans in the Cloud
Cloud storage offers a convenient and secure way to manage your scanned documents. Uploading scans to the cloud allows access from virtually anywhere with an internet connection, eliminating the need for physical storage and reducing the risk of loss.
Several popular cloud storage providers offer free tiers with limited storage, suitable for occasional scanning. For heavier usage, paid subscriptions provide larger storage capacities. When selecting a provider, consider factors such as storage space, security features, and platform compatibility with your devices.
Organizing your scans within the cloud is essential for easy retrieval. Create folders and use a consistent naming convention to categorize documents. Some cloud services even offer optical character recognition (OCR), enabling searchable text within your scanned files, further enhancing organization and accessibility.
Editing and Exporting as PDF
After scanning your document, most scanning apps offer basic editing features. These commonly include cropping, rotating, and adjusting the contrast and brightness.
Cropping allows you to remove unwanted edges or sections of the scan. Rotating ensures proper orientation. Adjusting the contrast and brightness optimizes the scan’s legibility, especially for documents with faded text or uneven lighting.
Once you’re satisfied with the edits, the final step is exporting. The most common and versatile format is PDF. Choosing PDF ensures compatibility across different devices and operating systems, preserving the document’s formatting and preventing unintended alterations.
Using Your Phone to Scan QR and Barcodes
Your phone’s camera can easily function as a QR and barcode scanner. Most modern smartphones have this functionality built directly into their camera app. Simply open the camera app and point it at the code. Your phone should automatically recognize and process it.
If your phone doesn’t have this built-in capability, several free and paid apps are available on both the Apple App Store and the Google Play Store that provide this scanning functionality. After installing, open the app and follow the on-screen instructions, which typically involve pointing the camera at the QR or barcode.
QR codes typically contain website URLs, contact information, or payment data, while barcodes usually represent product information. Once scanned, the relevant information will be displayed on your phone screen. You can then choose to visit the website, save the contact, make a payment, or learn more about the product.