
Are you getting the most out of your Android device? Many users stick with the default settings, unaware of the powerful customizations available at their fingertips. Optimizing your Android settings can drastically improve battery life, enhance privacy, boost performance, and personalize your user experience. This article explores ten crucial Android settings you should change right now to unlock the full potential of your smartphone or tablet. From managing notifications to refining security features, these simple adjustments can make a significant difference.
Whether you’re using a brand new device or have been using Android for years, reviewing and updating these settings is essential. This guide provides clear and concise instructions to help you navigate the settings menu and change these options right now. Discover how to optimize your Android settings for a more efficient, personalized, and secure mobile experience. Don’t wait – learn how to take control of your Android settings and transform your device today.
Disable Ads and Recommendations
Android devices often display personalized ads and recommendations, which can feel intrusive. Fortunately, you can control this behavior. Disabling personalized ads limits the use of your data for ad targeting. While you may still see ads, they’ll be less targeted to your interests.
You can usually find these settings within your device’s Privacy or Google settings. Look for options like “Ad Personalization” or “Ads Settings.” Turning off recommendations within specific apps, like music or movie apps, can also reduce unwanted suggestions.
Customize Quick Settings
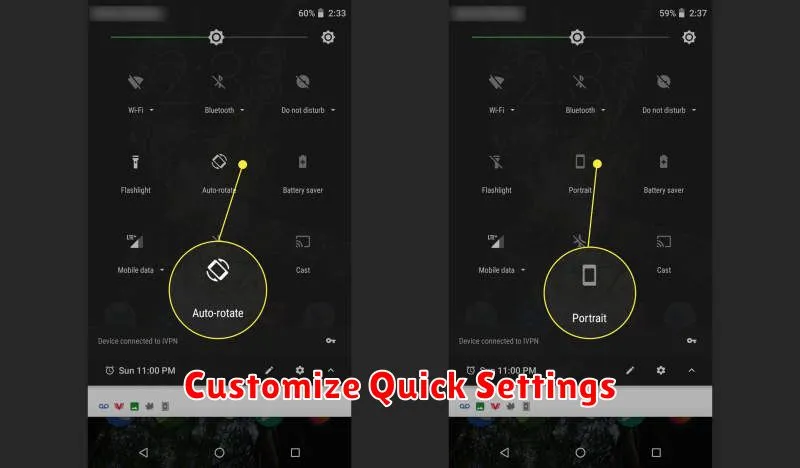
Android’s Quick Settings panel provides instant access to frequently used features. By default, it includes options like Wi-Fi, Bluetooth, and screen brightness. However, you can customize this panel to perfectly suit your needs. This allows for more efficient interaction with your device.
Accessing the customization options is simple. Swipe down from the top of the screen to fully expand the Quick Settings menu. Then, tap the pencil icon, which is typically located at the bottom of the panel. This will allow you to add, remove, and reorder the available quick setting tiles.
Consider adding tiles for features you use regularly, such as the flashlight, hotspot, or Do Not Disturb. Prioritize the most important functions by placing them at the top of the panel for easy access.
Limit Background Data Usage
Restricting background data usage can significantly extend battery life and reduce mobile data consumption. Many apps consume data even when you’re not actively using them. By limiting this, you can take control of your data usage.
To limit background data, navigate to Settings > Network & internet > Data usage > Data saver. Enabling Data saver restricts most apps from using data in the background. You can also manage background data usage on a per-app basis within the Data usage settings. This allows for more granular control over which apps are permitted to use data in the background.
Enable Developer Options
While not strictly a setting for everyday use, the Developer Options menu unlocks a treasure trove of advanced customizations. This menu is hidden by default to prevent accidental changes by less experienced users. To enable it, navigate to Settings > About Phone > Software Information and then tap on the Build Number several times. You’ll see a toast message confirming activation.
Caution: While exploring these options can be beneficial, exercise caution. Changing certain settings can negatively impact your device’s performance or stability. Only modify settings you fully understand.
With Developer Options enabled, you can gain access to useful tools like USB debugging for connecting to a computer, tweak animation speeds for a snappier feel, and limit background processes to improve battery life. These powerful tools allow for a more tailored Android experience.
Turn Off Unused Notifications
One of the quickest ways to improve your Android experience is to tame the influx of notifications. Unnecessary notifications can quickly become distracting and drain your battery. Take control of your digital well-being by disabling notifications for apps you rarely use or those whose alerts offer little value.
To manage notifications, open your phone’s Settings app and tap on Notifications. From here, you can customize notifications on a per-app basis. You can choose to completely block notifications, allow them silently, or only receive alerts for certain types of activity within an app. Prioritize the notifications that truly matter.
Set Up Do Not Disturb
Android’s Do Not Disturb mode is a powerful tool for managing notifications and minimizing distractions. Instead of simply silencing your phone, you can customize it to fit your specific needs.
Access Do Not Disturb through your phone’s settings, usually under Sound & vibration. You can set schedules for Do Not Disturb to automatically activate during certain times, like at night or during meetings.
Customize what gets silenced. Allow calls from priority contacts, or only allow alarms to sound. This allows essential interruptions while keeping less important notifications quiet.
Adjust Display Refresh Rate
A higher refresh rate makes animations and scrolling appear smoother. Most modern Android phones offer multiple refresh rate options. While a higher rate provides a better visual experience, it also consumes more battery power.
To find this setting, search for “refresh rate” in your settings. You’ll typically see options like 60Hz, 90Hz, or even 120Hz. Consider your priorities: if battery life is paramount, stick with the lower setting. If a smooth visual experience is more important, choose a higher refresh rate.
Some phones even offer adaptive refresh rates, which automatically adjust based on the content being displayed. This helps conserve battery power without compromising the experience when a higher refresh rate is beneficial.
Secure Lock Screen Options
One of the most critical security settings on your Android device is the lock screen. Ensure it’s configured to prevent unauthorized access. Navigate to Settings > Security > Screen lock.
Avoid less secure options like “Swipe” or “None.” Instead, opt for stronger protection such as:
- Pattern: A simple, swipeable pattern.
- PIN: A numeric code.
- Password: The most secure option, using a combination of letters, numbers, and symbols.
- Biometrics: Fingerprint or facial recognition, offering convenient and robust security (hardware dependent).
Selecting a strong lock screen method is the first line of defense against unwanted access to your personal data.
App Permission Control
Controlling app permissions is crucial for maintaining your privacy and security. Android allows granular control over what data and hardware each app can access.
You can review and modify these permissions individually for each app. Consider restricting access to sensitive information like your location, camera, microphone, and contacts if an app doesn’t genuinely require it for its core functionality.
Regularly reviewing app permissions is a good security practice. Be mindful of apps requesting excessive permissions, and revoke access for apps you no longer use.
Dark Mode and Battery Saver
Dark mode is more than just an aesthetic choice. On devices with OLED screens, it can significantly improve battery life. By switching pixels off completely to display black, dark mode reduces power consumption. It can also be easier on the eyes, especially in low-light conditions.
Battery saver mode further extends your device’s battery life by limiting background processes, reducing screen brightness, and restricting certain app activities. While beneficial for extending usage when your battery is low, battery saver mode can impact performance and notifications.
Consider enabling dark mode as your default display setting and utilizing battery saver when anticipating prolonged usage without access to a charger.