
In today’s digital world, screenshots have become an essential part of our daily communication. Whether you’re sharing a funny meme, capturing important information, or troubleshooting a technical issue, knowing how to take high-quality screenshots on your smartphone is a valuable skill. This article will guide you through various techniques to enhance your screenshotting abilities and ensure you capture crisp, clear, and perfectly framed images every time, regardless of your smartphone’s operating system (OS). Learn how to master the art of the screenshot and elevate your visual communication.
From basic screenshot capturing methods to advanced editing techniques, this comprehensive guide will equip you with the knowledge to take better screenshots on your smartphone. We’ll explore built-in features, explore helpful third-party apps, and offer tips for optimizing your screenshots for various purposes. Whether you’re using an Android device or an iPhone, you’ll find valuable insights to improve your screenshotting game. Prepare to capture and share your digital world with unprecedented clarity and precision.
Using Physical Buttons Effectively
Most smartphones utilize a combination of physical buttons to capture screenshots. The most common method involves simultaneously pressing the Power and Volume Down buttons. It’s crucial to press these buttons together briefly and release them quickly. Holding them for too long may trigger other functions, like powering off the device or activating the assistant.
Variations exist depending on the phone’s manufacturer and model. Some devices may use the Power and Home buttons instead. Consult your phone’s user manual or search online for specific instructions related to your device model.
Practice makes perfect. Try taking a few screenshots to familiarize yourself with the timing and pressure required for your particular device. You’ll soon find the sweet spot for capturing clean, crisp screenshots consistently.
Scrolling Screenshot on Android
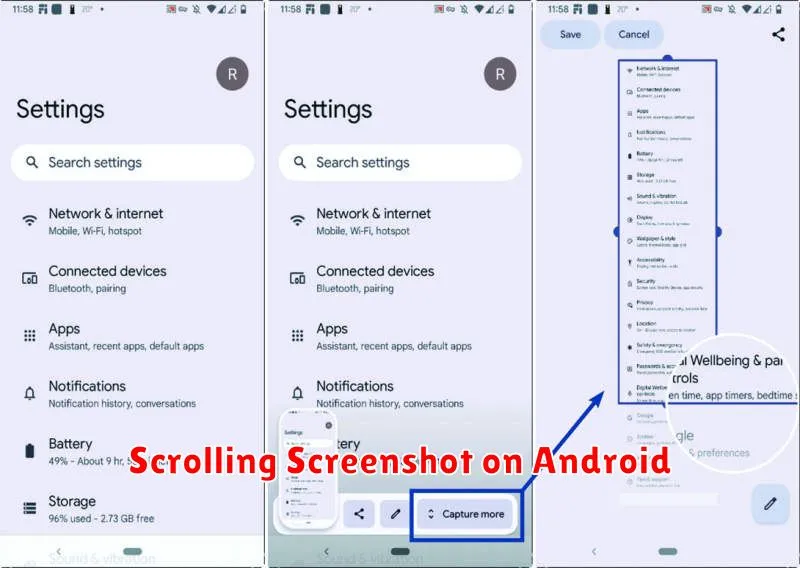
Capturing content beyond what’s immediately visible on your Android screen is often necessary. This is where scrolling screenshots come in. Availability and the method for taking these screenshots can vary based on your Android device’s manufacturer and Android version.
Typically, after taking a regular screenshot, a “Capture more” or similar option appears at the bottom of the screen. Tapping this button will usually scroll the screen down and stitch the additional content to the original screenshot. Some devices may offer a “Scroll” or “Long screenshot” button directly in the screenshot interface.
Experiment with your specific device to find the exact method. If the standard screenshot controls don’t offer a scrolling screenshot option, your device manufacturer may have implemented a different gesture or button combination. Consult your device’s user manual or online resources for specific instructions.
Markup and Editing Tools
After capturing a screenshot, most smartphones offer built-in markup and editing tools. These tools allow for quick modifications and enhancements, saving you the trouble of using separate image editing apps.
Common features include cropping, adding text annotations, highlighting specific areas, and drawing freehand. Some devices also provide shape tools, blurring options, and the ability to add stickers or emojis.
Familiarize yourself with the tools available on your specific device. This will allow you to quickly and efficiently edit your screenshots for clarity and impact.
Using Siri or Google Assistant
Voice assistants like Siri (iOS) and Google Assistant (Android) offer a hands-free way to capture screenshots. This can be particularly useful when it’s difficult to physically press the button combination, such as when using a phone mount or when wearing gloves.
For Siri, simply activate the assistant by saying “Hey Siri” or by pressing the designated Siri button, followed by the command “Take a screenshot.” Siri will then capture the current screen displayed on your device.
Google Assistant functions similarly. Activate it by saying “Hey Google” or by long-pressing the home button. Then, say “Take a screenshot.” The screenshot will be saved to your device’s photo library.
Third-Party Screenshot Apps
While built-in screenshot functionality is generally sufficient, third-party apps offer advanced features for enhanced screenshot control and editing. These apps can provide benefits beyond the standard options.
Key features often found in these apps include scrolling screenshots for capturing entire webpages, precise cropping tools, and a variety of annotation options. Some apps also offer instant sharing to various social media platforms and cloud storage services.
Consider exploring third-party screenshot apps if you frequently take screenshots and require more flexibility and control over the process.
Organizing Screenshots in Folders
A crucial step after taking screenshots is organizing them. A cluttered gallery makes finding the right image later a difficult task. Implement a system that works for you, whether it’s by date, app, or project.
Consider creating specific folders. For example, a folder labeled “Work” could house project-related screenshots, while “Travel” could hold confirmations and itinerary snapshots. This method allows for quick retrieval when needed.
Regularly review and delete unnecessary screenshots. This will save storage space and further streamline your photo gallery. Deleting redundant or outdated images helps maintain a clean and organized system.